Showing posts with label thrift. Show all posts

Sunday, 29 June 2014

OOTD | Blue Gold

Denim Dungarees - thrifted / Sheer Magenta Blouse - thrifted / Argo platform sandals - Jeffery Campbell / Amethyst pendant - Corky Saint Clair

Here I go again with my denim obsession. I'm sorry, I can't be helped but I don't know if there are any more pieces out there to purchase. These are another long lusted over and hunted for item. Long denim dungarees have been in stores and 'in style' the last season or so but I couldn't commit to any I had seen. Believing in fate is a huge part of thrifting so waiting for the item to find you gives me a huge sense of accomplishment. These dungarees were literally just placed on the rack by the shop volunteer when I snatched them up; meant to be.

Wednesday, 9 April 2014

Shopping | Vintage and Thrift Haul


I have managed to collect quite a number of new clothes in the last two weeks; more than usual for me anyway. Because I have a large haul of new (to me) clothes I thought I would share them with you. It started with a trip to my favourite, and semi-secret, op shopping location with of my favourite girls, Rhianna, where I picked up some incredibly 90s pieces. I think it was probably the influence of watching Clueless and Bring It On the week prior that brought out my inner Cher. 

Firstly, I think I have developed a new love affair with wrap skirts. I picked up two of them in my op shopping trip and would never say no to a few more. One is super simple in plain black and reminds me of skirts worn by ballet dancers (which I always wanted to be growing up). The other is in a classic green-red tartan sporting a buckle at the side of the waist. I did have to adjust the button to make it fit my waist better but thats the joy of buying second hand. Of the three blouses I found on my journey I am only certain I will be able to wear one. The oversized lace button up is right up my regular alley whilst the bright blue knitted vest-top and pink-burgundy velour crop top/boob tube may only be worn once or twice. 

The second half of my haul comes from Can You Keep a Secret? and once again they did not fail me. They were, and are still, having a half off all clothing sale until the Easter weekend. I took this opportunity to snap up a few groovy bargains with my fellow vintage clothing lover, Honor. I picked up the first two dresses for $10 each. Even though they are quite similar in their pastel floral patterns their cuts are strikingly different and appropriate for different occasions. I know the weather is starting to cool down and white cotton dresses can be hard to pair with tights but I couldn't resist. The bright collared top was down to $15 and an impulse purchase. It is a classic 80s square-cut button up and sits perfectly when tied at the waist. The print is fairly obscure but screamed "tropicana" at me so loud I had to have it. Again, it is fairly Summer-y but I can't be bothered with seasonal dressing in Brisbane; except of course to keep warm. 

And thats my most recent thrift and vintage haul! I think all together I would have paid less that $70 for all of these clothes which is a great bargain (especially for some great condition vintage/retro classics). I like to keep my thrift haunt close to my heart but definitely recommend Can You Keep a Secret? to everyone looking for a vintage bargain: consistently great quality at a reasonable price. 

Happy Wednesday!
Erin xx

Sunday, 23 February 2014

DIY | Tie Dye


You may recall in my last post that I mentioned I had been thrifting recently. Well here is a little more of what I managed to find on that particular journey and what I did with them. For a while now, my gal pal Ruby had been trying to organise an afternoon of tie dying, so whilst we thrifted we looked for white cotton garments to use as our canvas. That afternoon we took to my backyard and tried our hands at the funky art that is tie dye. 

Materials
white fabric to dye (natural fabrics like cotton, linen and rayon work best)
Tie Dye Kit  (we used one from Jacquard but any of similar description will suffice)
rubber gloves
rubber bands
disposable plastic sheet (we used a plastic party table cloth)
large bucket (for soda ash)
plastic bags and/or cling wrap

Now most of the steps you will find in the Tie Dye kit that you purchase. They provide you with exact measurements for the specific products you use so I won't go into too much detail with that.

First step is to dissolve the soda ash power in tepid water in a large container. Soak all the garments you wish to dye in this water for about 20 minutes (again, instructions may differ). During this time it is best to decide how you want your item to look; many kits will have several different designs and instructions for you to follow. I chose 'the brain' design for both of my items because this is my first attempt and I wasn't fussed with specific designs to begin with. 

After your items have soaked, lay them on the plastic sheet and contort into the shape you desire. Mine involved scrunching the fabric with my hands until it resembled a brain shape. Continue the process by securing the item with rubber bands. The bands will hold the item but also semi-protect those lines from soaking in the dye. You can see in the pictures above that Ruby's socks are covered in bands in specific ways where as mine are a lot more random. 

You then proceed to cover your items in dye. Again, I wasn't fussed with specific designs and went a bit crazy with whatever colour I felt like. I was aiming for a bit of a crazy colour and pattern design with just the desire to have a shirt that looked tie dyed. Ruby, more experienced, used specific colours on specific sections of her items. Both are acceptable and both turn out great. There is no wrong way to dye and they all end up looking pretty cool.

Once all your items are shaped and covered in dye, place in a plastic bag or wrap in cling wrap and leave for 12 - 24 hours. 

Take items out of plastic, undo the rubber bands and hang up to dry. Once dry, wash individually in a warm water and hang up to try again. Warm water helps colours to stain the fabric (thats why you normally rinse stained clothes in cold water). 

Once dry your items are done! You should have some pretty snazzy looking tie dyed garments. Again, whatever tie dye kit you have purchased may have different instructions so feel free to follow those against these but this is what worked for me. The most important thing to remember is that there are no rules and even mistakes will turn out looking awesome. 

Have fun and happy dyeing! 
Erin xx

Friday, 24 January 2014

OOTD | Check Mate

 Dress Thrifted / Socks Thrifted / Shoes UNIF 'Lost Sole' Boots

Hi lovelies! It's funny the things you find in thrift stores. Back at the start of summer I was set on finding a checked button up maxi dress. I even spent over $100 on one from UNIF but the fit wasn't quite right so I returned it. 

Thursday, 9 May 2013

OOTD | Surprising Comfort


Oversized knit top - thrifted / Cuffed patterned pants - thrifted / Loafers - Shag Vintage / Amethyst pendant - Corky Saint Clair / Messenger bag - thrifted / 'Over' matte lipstick - Illamasqua / Sunglasses - Sportsgirl / Snake thumb ring - Tree of Life


As my wardrobe is developing as I age, I realise the high percentage of it that is second hand. Today's outfit is a darn good example of that. Jess and I recently went an op shopping trip and ended up with a haul of 20+ items between us. The knit top and pants are two of the items I found and I never thought I'd be making an outfit for the blog from them. I popped them on this morning out of a desire for extreme comfort and was pleasantly surprised with how nicely they complimented each other. 

Wednesday, 27 February 2013

Op Shop Haul Numero Uno

So, if you recall from my last post, our friend Honor visited me in Melbourne last week. Just like Jess and I, Honor also has an acute (acute? Who am I kidding?) addiction to the pleasures of Op and Thrift shopping (yes, I know they're the same thing but us Australian's do prefer Op to Thrift). And with these two facts combined, a haul of this description was inevitable. 


The first five items were found at a Vinnies and Salvos store at Mornington on the Mornington Peninsula during our road trip last week. Honor purchased the over-sized green stripy blouse and high-waisted Levi denim cut-offs while I purchased the pink floral button-up maxi dress, green velvet high necked top and black leather messenger bag. I think the most we paid for any of the items was $7 (for the Levis) and the least was $3 (for the bag). I find some Op shops or Thrift shops price their items too steeply and but these two stores at Mornington were incredibly affordable and quite fruitful. So if you're around that area and love a good successful rummage, head to Mornington's St Vincent de Pauls and Salvation Army stores. 


These last two items were sourced by Honor at Camberwell's Sunday Markets. I knew if I took her she wouldn't be able to help herself. Why, the only reason I've been able to hold back myself is a basic lack of money. The markets are full of vintage and retro clothes, shoes and knick-knacks (and when I say full, I mean full). Honor managed to pick up a bargainous $5 chambray shirt which she had been searching for for quite some time. The cute blouse on the right was picked up for $10 after we walked past it styled on a manikin. She just couldn't resist its pussy-bow-polka-dot charms. 


And thats it for my Wednesday post folks, if you've heard Melbourne/Victoria is a great place to op shop and source vintage/retro treasures, you're hearing it here again. If you're already a fan, give me a heads up on places I'm missing out on.

Erin xx

PS. Sorry about not posting on Sunday. I was baby sitting all weekend and by the time I got home on Sunday evening my brain was unable to conjure up anything even vaguely exciting to tell you. 

Tuesday, 22 January 2013

OOTD Uniform Via Thrift


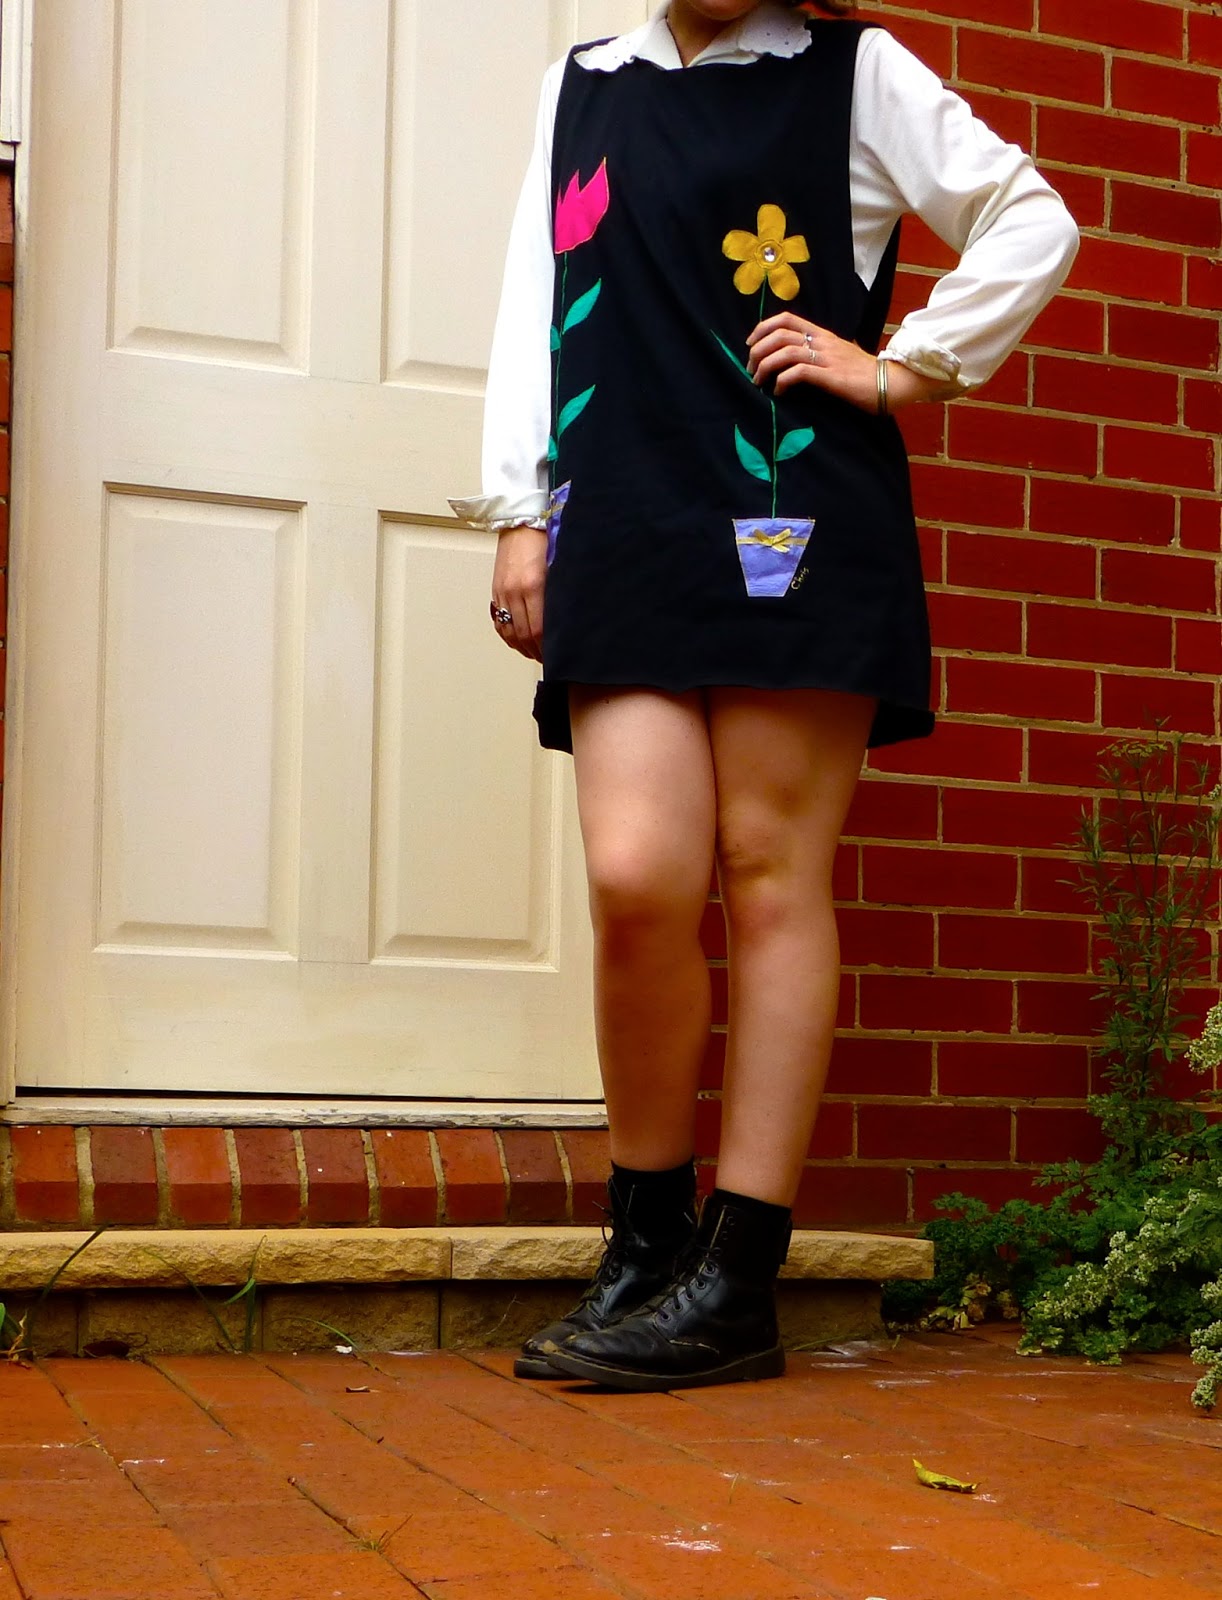
Blouse - Thrifted, Tunic - Thrifted and altered, Dr. Marten 1490 Boots - Thrifted, Rings - (from left) Lovisa, Thrifted, Bingo Betty, and Etsy, Bangle - Market stall at Woodford Folk Festival, Lips - Illamasqua 'Spell' medium pencil and Clinique 'Super Moisturising Gloss'


This OOTD accidentally reminds me of Jess and mine's winter uniform. Navy blue tunic and a white button-up blouse (yes, I know this one is cream). And as much as I despised wearing that uniform, it creates something nice and nostalgic about this outfit. Virtually everything is thrifted, which you will learn is not unusual for me. The blouse I dug out for $2 at my favourite thrift store near my old home, and the tunic also thrifted (see Sunday's DIY post). My boots I think I've mentioned before; my Dr. Martens are one of my most treasured and well used possessions. 

Here in Melbourne, the Summer can be unpredictable in its temperature variations. It can range from 12 to 40 degrees within two or three days. I wore this outfit on Saturday on a casual stroll down to the Camberwell shops and was pretty pleased with the fact I could wear boots and a long sleeve shirt in Summer. 

It was also my first day experimenting with styling my new haircut. The first wash after the hairdresser styles it is always interesting. I purchased this snazzy new product called the Miracle Hair Treatment from ELEVEN and so far I've been pretty impressed. With a tousle through my hair and a thorough blow-dry with my hands the result was exactly as expected and desired. Super soft, lacking frizz, and that perfect 'rolled out of bed' look. 

I've been accruing more and more rings of late. However, I have to wear sterling silver as my skin instantly turns green if it's cheap metal. My favourite is the tiny little crown ring on my ring finger (far right). Jess bought me this for my 20th birthday last year. The one next to it is a recent purchase from Bingo Betty just around the corner from my house. I love that it's a square shape. Second from the left, you'll see a ring I found hidden in my mum's collection - aching to see the light of day. The fourth ring was just a cheapie pick-up from Lovisa during its seemingly continuous 3-for-2 sale.  

Have you been grabbed by the recent trendy addiction to rings? I struggle finding sterling silver ones with multiple sizes - any tips?

Erin xx


Sunday, 20 January 2013

DIY Tragic to Hip not The Tragically Hip


I found this dress (pictured on the left) at a thrift store for $12. It was midi length, an extremely heavy cotton knit, had a tight t-shirt neckline and was the owner of two extremely unnecessary shoulder pads. And yet, I picked it up. Then I put it down and browsed some more. I went back to look at it again and put it down again. But I couldn't stay away. 

Side note: I do that a lot when I thrift shop. Ask my many, often bored stiff, companions. 

I think I knew though that I had wanted to attempt a cut-out t-shirt DIY for quite some time. The problem was that I don't wear a lot of t-shirts and the ones I like tend to be firm fitting - something about oversized shirts on me seems to scream pijamas. This dress solved the problem. It isn't a modern, thin, crappy cotton knit, which normally turns me off t-shirts. It is quite heavy and I could sense that its raw edge wouldn't roll too much. I also have a soft spot for the simple and homey flower patchwork on it. Too kitch to resist! 

Basically, with simple DIY jobs like this, where all you really need to do is snippity snip snip, patience and small steps is key. Don't cut too much at once because once you've cut it, you can't uncut it. 

All I used were good quality fabric scissors and pins. Oh and a long T-shirt dress to snip, snip and snip. I thought about what I wanted changed and how I would best achieve them by cutting. I cut the neckline out to a shape that framed my collar bones well. I then cut the dress to a length that was short enough but not too short that when the fabric rolled it would become unwearable. Its also important to make it straight along the bottom - even though the fabric will most definitely roll, you want to have some precious to achieve that 'perfect yet shabby' look. 

DIY cutting 01

CIY cutting 02

DIY cutting 03


Above you wil see the process I went through when cutting the sleeves. I started by leaving a fair amount of room for error between the already cut neckline and where I wanted the sleeve to end. When you reach the bottom of the sleeve you want to cut a right angle outwards (like in the second image). This is a basic rule when cutting off t-shirt sleeves. It just looks and fits around your body better. If you're sleeve isn't thin enough once you've tried it on and you want to keep cutting, keep cutting. 

To replicate the perfect sleeve I folded the dress in half and pinned the cut edge - making sure all the other uncut edges matched perfectly. The second sleeve was then cut off.

I then washed it, as you should always do with thrift store purchases before wear. This was also an opportunity to see how much the fabric would roll and so far it has been minimal. I'm sure though, with more washes and wears it will continue to roll up.

And thats it. You'll see the last photo in my next OOTD post. Until then, let me know if you try my sleeve cutting technique or have a better one for cutting up oversized shirts.

Erin xx

LinkWithin

Related Posts Plugin for WordPress, Blogger...